
Copyright © January 23, 2003 by Sandra L. Willis for Sandy's Place
This tutorial is written for PSP v7
For this tutorial you will need:
PSP 7 (will probably work in 6 but I have not tried it yet)
The "Neu Filter" by Sandy Blair
Unzip to your plugin folder.
Click to go see some finished examples. (This will open a new window, x it out to return to this page).
Lets get started:
1. Open a new workspace 300 x 300, white background, 16 million colors. On the layer palette, right click and "Promote to Layer".
2. Add a new layer.
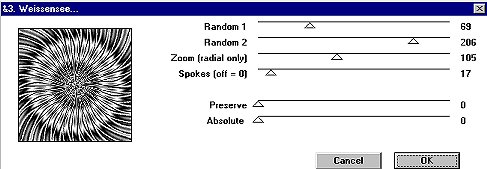
3. Go to Effects/Plugins/Neu/Weissensee and move the Spokes slider to 17.
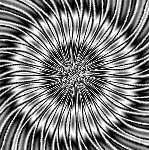
4.Click OK, and now your picture looks like this:
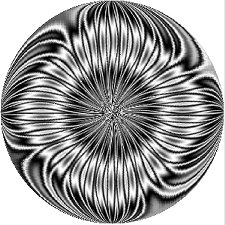
5. Go to Effects/Geometric/Circle and apply. Now your picture looks like this:
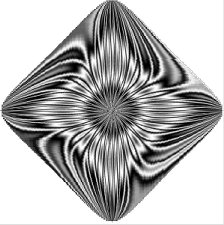
6. Go to Effects/Geometric/Pinch and set the effect slider to 99%, click OK. Now your picture looks like this:
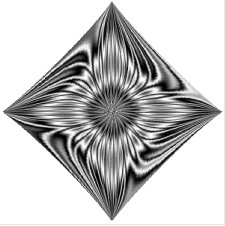
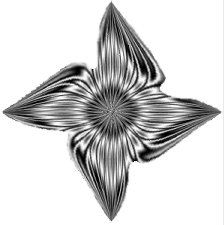
7. Go to Effects/Geometric/Circle and apply again. Now your picture looks like this:
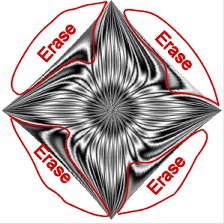
8. Now we come to the step that is the reason I had you make the white background. We are going to erase some of the picture and it will be easier to see that you have all stray pixels thoroughly erased with the white behind the flower. Following the screen shot below, carefully erase parts to leave a nice petal shape. I have old eyes, LOL, so I had to really zoom in close to do this. Zoom in as you find necessary. It is also possible to remove these parts with the lasso tool set point to point. However, I found it easier to get a smooth line with the eraser.
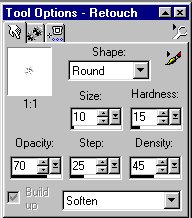
9. Activate the retouch tool and with the following settings smooth out the edges a little bit.
10. Your picture should now look like this:
11. Now activate the background layer on your layer palette and by right clicking delete it. Then activate the flower layer and duplicate it by right clicking.
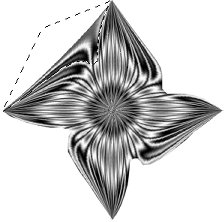
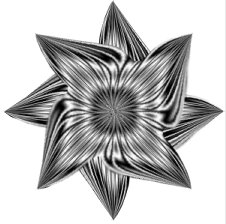
12. Go to Image/Rotate and set it for Left/Free/45 and click OK
13. Merge these two layers with Layers/Merge/Merge Visible. And now your picture looks like this:
14. Duplicate this layer. Go to Layers/Arrange/Send to bottom or, just drag the duplicate below the original layer.
15. On the duplicate layer, using your select tool, go to Selections/Select All then tap in the middle of the flower to enclose the flower with "marching ants".
16. Set your Styles palette foreground to a nice bright red, I used #D10303, and flood fill the flower. Deselect. This layer now looks like this:

17. On the layer palette, activate the original flower layer, and make 3 more duplicates. There should now be 5 layers on the layer palette.
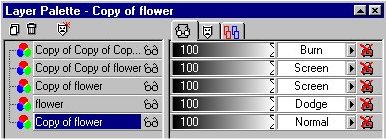
18. We are now going to adjust the settings which will color our flower. On the right hand side of the Layer palette find the word "Normal", just to the right of that is an arrow, click that arrow. A whole panel of choices comes up. Change the settings of the layers as you see below.
19. Your picture should now look like this:
20. Go to Window/Duplicate and make a copy. Save the original as a .psp so you can do things to different layers. Close the original.
21. On the Duplicate go to Layers/Merge/Merge visible
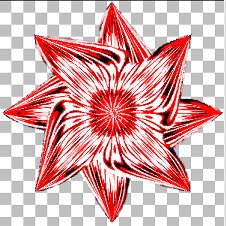
22. Go to Colors/Adjust/Brightness & Contrast. Set the Brightness to 5 and the Contrast to 72
23. Your flower is now finished. Save it, or tube it. Colorize it or deform it. There are lots of possibilities.
I found that when I tried to make different colors, by flood filling the base layer with different colors that I sometimes had to make changes to the layers blend modes. In some cases layers needed to be removed, and in others just rearranged. The settings for the final color adjustment to brightness/contrast also needed changes (usually considerably lower ~ -29/52). You just need to play around with each color to see what looks best.
Click to go see some finished examples. Or go here for a Bonus page of ideas!(This will open a new window, x it out to return to this page).
|